Showing posts with label crafts. Show all posts

Photo Image Transfer Canvas Mod Podge Craft

Following on from my post, Photo Canvas Mod Podge Craft, I looked at other Pinterest pins to see about getting a better, more realistic photo canvas effect, instead of just using proper photographs.
I learnt about image transfer from copies. There are lots of pins and blogs on photo image transfer canvas Mod Podge crafts.
This is the method I used to transfer the photograph.
  • I chose the picture I wanted to use
  • opened it with Photoshop
  • Resized image to 7cm x 7cm. Image > Image Size > change width & height to 7cm. I need to untick constrain proportions.
  • I then flipped the photograph so it was a mirror image. In Photoshop, Image > Rotate Canvas > Flip Canvas Horizontal.
  • On some pictures I increased colour / saturation too.
  • I printed the photograph using my home inkjet print.
  • I cut the photograph out.
  •  Next I applied a layer of Mod Podge to the canvas, I think this can be done either way round on to canvas or to photograph.
  • I then laid the image of the canvas, ink side down.
There are two options now.
  1. Leave to set for 5 minutes or so and carefully peel off the paper whilst Mod Podge wet.
  2. Leave to dry overnight.
  • I preferred the result from leaving over night, ink seems to soak in more.
 
  •  Next, get a small dish / tub of water and wet the canvas. The image will start to show through the back of the photograph again.
  • Gently, rub the paper off. Wear gloves if possible, otherwise expect an ink stained finger!

 
  • Keep going, it takes patience at this point, but carefully! This one I was a bit heavy handed on!
  • I broke all the rules of the Pinterest pins next, I rinsed the canvas under a slowly running tap. Most posts stay that coating in another couple of layers of Mod Podge will deal with the bits of paper left. But hey, I'm a craft rebel!
  • I left to dry for several hours, before coating with a couple of layers of Mod Podge.
My next couple of attempts were a lot better, but it's still a bit hit and miss, due to my heavy-handedness. 
Some have been good enough to give as presents, some went straight in the bin! ha!

I bought my canvases from Poundland.

Alex and Alexa Spooky Fruit Blogger Competition

Making a pumpkin for Halloween?
Seriously, that's so last year!

Spooky Fruit is the new (orange and) black.


AlexandAlexa.com are running a Spooky Fruits competition for Blogger's to win a host of Halloween goodies.

There are 3 prizes to win.

Everything you need for a truly terrifying Halloween with the kids.
  • A cutely, creepy knitted toy from Lucky Boy Sunday
  • Two Halloween kids’ costumes from Lucy Locket
  • Two fabulous Lego storage heads for Halloween candy
  • A selection of beautiful Halloween party supplies for kids from Meri Meri
  • A set of cute Halloween figurines by wooden toy suppliers Le Toy Van
(Total value £223)
We will also feature the winning spooky fruit creation on the AlexandAlexa, Life & Style.


  • Two Lucy Locket Halloween Costumes
  • Halloween party supplies from Meri Meri
  • Le Toy Van Halloween toys
(Total value £118)


  • Halloween party supplies from Meri Meri
  • Le Toy Van Halloween toys
(Total value £58)

Great prizes, right? So how do we get involved?
  1. Create a spooky fruit creation and share on your blog.
  2. Include a link to the competition page here.
  3. Tweet or email your entry to AlexandAlexa.com via @AlexandAlexa or social@alexandalexa.com
  4. Closing Date: midnight (GMT) 24th October 2013.
Full T&C's on competition page: http://lifeandstyle.alexandalexa.com/halloween-party-supplies-for-kids/ 

Halloween Card / Invite

Having (finally) linked up with Wendy at Handmade Harbour for Midweek Papercraft Party last week with my cheap weight loss tracker, I won! Woo Hoo!

This week's theme is Halloween.

So here's my entry:

I'm taking a quick craft break from studying, so it's a bit basic this week. 

I looked on Google for free Halloween scrapbook paper for ideas. I have used freedigitalscrapbooking.com before, so I looked there and found a really cute purple ghost one, from here.

Cute, right?
I printed it slightly smaller that A5, I trimmed using my cheap little cutter, I cannot cut straight!


I then glued to an A5 piece of purple card. I'm designing this as a card cum invite, but you could just use a piece of A4 folded in half for a card.

I created a banner using Word and Bleeding Cowboy font, saying Happy Halloween.
I printed and cut out, layering on top, although to be honest, I could have printed over scrapbook paper, but I liked the mix of purples.

I created a Mummy. I make a body shape in card, then covered it in strips of tissue paper bandages.


Next I created Daddy, (can you see where I'm going with this...?). I found a google image of a skeleton. I was going to use Mr Printable's Bag of Bones tag idea for create a skeleton, but couldn't find brads.


For Little Monster, I used a digital stamp - friendly Halloween trick or treat monster - from Handmade Harbour shop. I coloured him in using pencils, before cutting him out, and accidentally breaking his arm off. Oops!


I added my people to the card, labbelled them and added 'Come join us...'.


I think Mummy might have worked better as a print out, it's rough but you get the idea! :-)


Reasons to be Cheerful

For more information on what Reasons to Be Cheerful (#R2BC) is all about please check out this post from Michelle at Mummy from the Heart for a full description.

This week's Reasons to be Cheerful: 
  1. My exam is on Tuesday and I'm really struggling, so will be glad to see the back of it!
  2. Although I would have preferred a break, my new course starts today, it's advanced writing and I'm glad to get back to something I'm good at!
  3. I lost another 2lbs this week at Slimming World. Expecting a bad week this week as I am using every spare minute to revise, so cooking and having breaks isn't really on the agenda...
  4. I had a fabulous night with my best friend on Wednesday, even if it did mean wandering the streets in the rain and contemplating a break in! lol
  5. Little Lady is doing well, although I suspect she's having a growth spurt or coming down with something as she's really tired, she not giving in though which is making her (and mummy) cranky.
  6. I've found some crafty things I want to make for Christmas presents. One involves using Kiki's old clothes I haven't got around to ebaying, so watch out for some crafty posts (when I find the time).
  7. I entered the weight loss tracker I made for myself and friend into Handmade Harbour's paper craft party, and won! Check out my shiny winner's badge on the right side bar :-)
  8. I continued with my group and felt a bit more comfortable this week, it really helps me that other are going through the same thing if you know what I mean, obviously I'd rather nobody ever suffered mental health difficulties.
So over to you, what have you been up to this week? 
What are your reasons to be cheerful? Do let me know.

Cheap Weight Loss Tracker Craft

Whilst browsing on eBay recently, I came across Weight Loss Journey mini chalkboards.


 Now I liked the idea by handmadebyzoe2012 but at £8.50 including postage, it seemed a little expensive. So I did what any crafter does in these situations, I look to see how much it would be to buy the component pieces and made my own.

 Firstly,  I bought 2 MDF plaques with 3 hearts each, for a total of £4.95, figured I'd make one for my friend who is currently joining me a Slimming World. I bought mine pre-cut from agilisltd on eBay.


Agilis crafts & Personalised Gifts do various shapes and sizes, check them out here.

I also bought some chalkboard paint, again from eBay. I chose spray paint as I figured it would be easier to get a smoother surface.
I purchased this from gr8value2you. I actually bought two because I have an idea for the other... 
It was £5.10 including postage.  

 Both sellers dispatched orders next day, so I received with a few days, very happy and will use both again.

I decided to spray the plaques as well as the heart, I thought I could add an inspirational message maybe. Or just write the heart details, This Week, Total, To target.

*hint* lay it on greaseproof paper when spraying, it's easier to clean and doesn't stick.


 I applied 3 coats of chalkboard paint, letting each layer dry for about 30 minutes.

Once dried, I didn't spray the back as they are to be hung up, but you could, I choose some ribbon to attach the hearts. After playing around with lengths, I cut and tied it.
I wrote lbs on to the 6 hearts, 3 for each.

I decided to add cupcakes as the design. I used a free digi stamp from Wendy at Handmade Harbour's shop. Available here.


I cropped the stamp to just the cupcake, and then in photoshop edited the banner.
 I coloured the cupcakes in.
I cut out the cupcake, wrote on the banners, This Week..., So Far..., ...'til Target, and applied to a holographic purple card background. I then added several layers of Mod Podge matt to seal it.
As this dulled the holographics, I added a couple of layers of Mod Podge sparkle.

I glued the card in to place, and done!


What do you think?

Reasons To Be Cheerful

For more information on what Reasons to Be Cheerful (#R2BC) is all about please check out this post from Michelle at Mummy from the Heart for a full description.

This week's Reasons to be Cheerful: 
  1. I lost another 3.5 lbs, so the weight I'd put on last week plus another two pounds.
  2. My friends are amazing!
  3. Daddy is happier about childcare.
  4. I got crafty, I'll post soon.
  5. I'm trying to organise my crafty corner, which means scanning all my patterns and 'how to's' to digital.
  6. I'm doing quite well with Christmas presents. We are on holiday this year, so I want to get sorted soon, so we have money to spend! 
  7. I finished my last uni assignment for this OU module, I had to pull an all nighter to get it done. Now just need to get ready for the exam. 
  8. I was also featured on Michelle's blog as R2BC blogger of the week last week :-) Thank you Mich x

So over to you, what are your reasons to be cheerful this week?

Photo Canvas Mod Podge Craft

I have a large photo canvas of Kiki from her trip to Olympics, and love the look of it. 


I really like canvas prints, but they are so expensive. 
I found a few pins on Pinterest about using Mod Podge to transfer images.

The first one I tried was using actual photographs. I bought some mini canvases from Pound Shop, 4 in a pack 7cm x 7cm.

I trimmed some pictures to size and put a layer of Mod Podge on each canvas, I then laid the photograph, image size up, once it had dried I added some extra layers of Mod Podge to seal.

*note* I had no Matt Mod Podge so I used Sparkle Mod Podge. Same thing but glittery. Be warned, if you haven't used it before, it is very glittery.

The angle and light on the photograph affect the amount of sparkle. I would recommend Matt Mod Podge!


Sensory Play Bottle Craft

I've posted before about sensory play ideas, and about how much Pinterest has given me ideas.
I have made the bags from sandwich / freezer bags, gaffer taping the edges, but as Little Lady still likes to try and put things in her mouth, I was looking for a more resilient way.

Bottles! Yes, small pop bottles in my case. They are more solid, can be stood up, rolled, etc. And more importantly the lids can be glued on securely. I bought Asda's Cherryade in small 250ml bottles, as I thought chunky enough to hold, but small enough to pick up easily full.

I bought a selection of sequins at the Pound shop and some hair gel.
Two bottles, just have coloured sequins, homemade maracas!


One was filled with blue hair gel and beads, I ended up tipping some of the gel (and subsequently beads) as the gel was too thick, I added some water to get a bit of movement in the beads.


Three had a mixture of multicoloured beads and water. The blue has a drop of blue food dye.


The last two just have 2 colours of glitter mixed into the water.


Finally, I glued the screw tops on to the bottles.


Birthday Card Craft

As part of my promise to myself, I am trying to do more crafting again. I needed a birthday card from my good friend's birthday today, so I made it.

Here it is:


Here's another two showing the decoupage:


What do you think? Please let me know.

Happy Birthday Fran, we love you x

Blogging Every Day in August: 5 favourite blogs (Day 17)

Sarah at Yummy Mummy In Training has set herself a challenge of blogging every day in August and has listed her prompts. As my blogging is a bit hit and miss at the moment, I will be using her prompts to generate some ideas too.

Today's prompt is: 5 favourite blogs

My top five blogs (in no particular order):
  •  Kate on Thin Ice - Kate was one of the first people I first started following (blog and twitter). I love her humour, her openness, and ability to write. She also blogs at The Naked Mum.
  • purplepersuasion - Charlotte's blog has been helpful and informative in my struggles with mental health and the rigmarole that goes with it. Many of her posts have affected me (often bringing tears), I often feel she can read my mind, as Charlotte can articulate my thoughts so easily. 
  •  Mummy from the Heart - Michelle runs the weekly linky / blog hop Reasons To Be Cheerful. I love that she encourages people to share little bits of happiness from their weeks. The depression can mean I often cannot appreciate happy times, so forcing myself to write three things each week helps me.
  • Jay at Cosmic Girl (and also of Mocha Beanie Mummy), who is responsible for Silent Sunday. She takes great photographs and is funny and clever, if in any doubt please read her Speak To Me page.   
  • Wendy at Handmade Harbour is another blog I love to read. Handmade Monday is a great blog hop for all you crafters out there, unfortunately I only read, and don't take part. She has recently launched a range of instantly downloadable digital stamps too. 

    I suppose I really should add mine here too, as it's a place I love to waffle rubbish, record things of interest, and share my photos.

    What are your favourite blogs? Do let me know.


Blogging Every Day in August: Get Crafty (Day 8)

Sarah at Yummy Mummy In Training has set herself a challenge of blogging every day in August and has listed her prompts. As my blogging is a bit hit and miss at the moment, I will be using her prompts to generate some ideas too.

Today's prompt is: Get Crafty

I have a variety of crafty things on the go at the moment, but due to depression lack of motivation is killing them all. My current O.U. course is Design and Designing, which involves lots of drawing and sketching, but the course is really draining and I'm struggling.

I have also got some plastic bottles to make the sensory bottles / bags with. I just need the contents now.

I'm sharing a couple of sketches from a recent assignment, please remember, I'm not an artist by any stretch of the imagination!


I'd also like to share a blog hop with you, I'm not a member as I cannot find the time or motivation, but I enjoy reading them.


Handmade Monday over at Handmade Harbour:


And also Wendy's new website:
Handmade Harbour digi stamps 

I look forward to trying out some of the ideas on Handmade Monday eventually, and playing with digistamps, something new and exciting. 

Do stop by.

Hexies, Inspiration, and Sewing

Remember on my post about my attempts at baby bib making, I mentioned my stash of Fat Quarters? I managed to use one making two of the bibs and was Googling what else I could do with them, as I knew the bunting was never going to happen.

I discovered Hexies! Or Hexagons if you prefer. They are a basic staple of lots of quilts. I doubt I'd ever have the patience to do it, although I did admit to being totally in awe of those that do. A quilt of Hexies made using outgrown baby clothes does sound quite sweet; but so does selling them to buy next size up, and in the current financial climate, more logical for me.

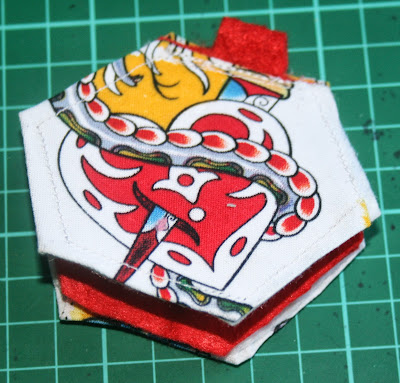
But I loved the Hexies, I just couldn't stop thinking about them and what I could use them for or make. Honestly blogs are full of quilting p0rn! I found a blog by Angela at My Three Sons and she shows a tutorial for a needle book using Hexies here.
 
Hmmm a small, maybe manageable task, I wonder...

As I had some of the tattoo inspired print left over, I positioned the Hexie over the print to pick out individual motifs, I think the less challenged sewing linguistics amongst us call it fussy cutting. I'm probably wrong, feel free to let me know! 

I made two needle cases, one for me and one I gave to Nanna with the Baby Shoe Pincushion I made here.


Baby Shoe Pincushion

I found Wendy's at Handmade Harbour blog a while ago, and fell in love with her style as well as her fabulous makes. 

One of my favourites was How to Make a Pincushion from an Old Baby Shoe.

The link shows the original blog post with instructions. 

I made two (obviously a pair of shoes!) from a pair a pair of boots Kiki had outgrown. I kept one, and gave the other to Kiki's Nanna for Mother's Day.